Tuesday, July 16, 2013

Scotch Shortbread

wedge cuts of shortbread
If there's one thing that I LOVE, it's desserts. I love cakes, cookies, and pies. You name it, and I love it! One of my favorite cookies is shortbread, and this is one of my favorite shortbread recipes because it is so easy to make.

All you need is:

  • 1 cup (2 sticks) of butter. I use the low-fat butter.
  • 1/4 cup of granulated sugar
  • 1/4 cup of powdered sugar
  • 1 teaspoon of vanilla
  • 2 cups of flour
Preheat the oven to 325 degrees Fahrenheit.

You'll want to let the butter sit on the counter for around 1/2 hour so it comes to room temperature. This makes it easier to blend in the the sugars. 

You'll bake the shortbread in pie pan. Melt some butter in a sauce pan; then use a pastry brush to brush the melted butter around the bottom and sides of the pie pan.

In a bowl, mix the butter, granulated sugar, powdered sugar, and vanilla till it's light and fluffy. It will be very easy to stir and mix. Mix in the flour. Some folks will tell you to mix the flour in with your hands, but  I use a spoon because I'd rather not waste the dough on my fingers when I can make cookies from it.  

Spoon the dough into the pie pan, and spread it around the pan. I plop all the dough into the center of the pie pan, and carefully spread it out.

As an additional treat, you can chop a 1/4 cup of pecans and sprinkle them on top of the dough in the pan. I also added some mini chocolate chips. Lightly press the topping into the dough, just so it doesn't fall off later.

Put the shortbread into the oven for around 45 minutes. The shortbread will be brown around the edges, and when you press on the center with your finger, it will still give a smidge. You don't want it to give a lot, but you also don't want to over bake the cookies.

Take the shortbread out of the oven, and let it cool in the pie pan for around 15 minutes. Using oven mitts, turn the pie pan over onto a cutting board. Cut the pie into 8 pieces, and let it cool some more. Or if you are like me, you start eating as the shortbread is warm.

As you can see, shortbread is very easy to make. Use your imagination, and use some other toppings, like butterscotch or peanut butter chips or caramel. 

Remember that shortbread also makes a good side with a dish of ice cream. Enjoy! 


Tuesday, July 2, 2013

Roasted Chickpeas

roasted chickpeas
One of my favorite snacks is roasted chickpeas. They are a good source of fiber, and boy, are they delicious! If you want to try some, here's what you have to do:
  • Preheat your oven to 400 degrees F.
  • Get a can of your favorite chickpeas. I usually buy the cheapest kind.
  • Open the can, and dump the contents into a colander. 
  • Rinse the chickpeas. This removes the oil that they were canned in.
  • Dry the chickpeas. You can do this by letting them sit in the colander for a bit, then dump the chickpeas into a paper towel to bloat dry.
  • Combine the following in a small mixing bowl:
    • 1 Tbsp olive oil
    • 1/2 tsp. cumin
    • 1/2 tsp. paprika
    • 1/2 tsp. pepper
    • 1/2 tsp of salt (or less if you don't like salty things)
  • Add the chickpeas to the mixing bowl, and give a good shake to coat the chickpeas.
  • Spray a small oven tray with Pam olive oil spray.
  • Spread the chickpeas evenly over the tray. They should be in a single layer.
  • Put the chickpeas in the oven for around 45 min. If you want them less crispy, bake them less time.

Be careful with the chickpeas when they first come out of the oven to make sure you don't burn your mouth. If you find that you really, really love the chickpeas, you can make more than one can at a time, as long as you have a big enough oven tray. 

Try some other seasonings too, like Italian, Southwest, or just plain salt and pepper. Experiment, and enjoy the outcome!


Wednesday, June 12, 2013

Tadig (rice with crispy potatoes on the bottom)

Tadig made with instant Minute rice
One of my former bosses was Iranian, and when she would invite me to dinner, she would always have this really tasty rice dish as the side. Crispy potatoes were on the bottom of the rice, and it was a special treat to get the potatoes. It turns out the dish is called Tadig, but all the recipes online called for cooking basmati rice.

Well, I decided to give it a try on my own. I don't have fancy basmati rice; I'm more of a Minute rice type of cook. However, I decided not to let that stop me.

Preheat the oven to 400 degrees.

I got an 8x8 inch Pyrex baking dish. I poured only enough olive oil into the dish to cover the bottom. You don't want the bottom to be dripping in oil, but you need the oil for the crisp.

I peeled a small potato and cut it in thin slices to cover the bottom of the dish. You can sprinkle a bit of salt on the slices of potato.

As I said, I use Minute rice. Not only do I use Minute rice, but I use the kind that cooks in five minutes!  Undaunted, I boiled 1 1/2 cups of water with 2 tablespoons of butter, some salt, and some pepper. When the water came to a boil, I stirred in 1 1/2 cups of rice. Then I poured the mixture on top of the potatoes in the Pyrex dish.

Cover the dish with aluminum foil and put it in the oven. Bake for around 90 minutes. It takes that long for the potatoes to crisp, and surprisingly, the Minute rice also turned out just fine!

Since I didn't use a lot of rice, the whole dish had a good crispy texture. You can add more rice if you want.

As you can see by the picture here, it all turned out just great. Even with instant rice, you too can make a very tasty dish of Tadig.

Monday, June 3, 2013

Potato Chip Cookies

Potato chip cookies
I was in the mood to make a different cookie, so I started hunting around for ideas. I found a potato chip cookie recipe that turned out a tasty little treat!

Ingredients
1/2 cup butter (I use light butter and put it out so it gets soft at room temperature)
1/3 cup granulated sugar
3/4 teaspoons vanilla
1 cup flour
1/3 cup of crushed potato chips (comes out to around 1 ounce of chips. I used low salt Wavy Lays)
1/3 cup chopped walnuts (around 1.5 ounces of nuts)

1 Tablespoon of granulated sugar (when you smash the cookies before they go into the oven--put this sugar in a small flat dish)
powdered sugar 

Cream the butter, 1/3 cup of sugar, and vanilla until they are well mixed. Add the flour, and mix well. Then add the potato chips and walnuts. Mix it all up really good. Then cover the bowl with plastic wrap, and put it in the refrigerator for around an hour. This will make the dough easy to handle.

Preheat the oven to 350 degrees.

Get your dough and ungreased baking sheets. Roll the dough into little balls, and evenly space around the baking sheet. They say 2 inch balls placed 3 inches apart, but use your eyes and common sense with this one. You don't want the cookies to touch when you smash them.

Put some oil on the outside bottom of a glass. Dip the glass into the 1 Tablespoon of sugar. Press the glass down on a cookie. This flattens the cookie and puts some sugar on it.

Put the cookies into the oven for 12-15 minutes. They won't look brown on top, but you can see the bottom browning. That's when they are done. My cookies took the whole 15 minutes.

After they cool on the sheets for around 7 minutes, take the cookies off and put them in a container, and  dust with powdered sugar. 

I only got 2 1/2 dozen cookies from this recipe, so if you are feeding a ravening horde of kids, you may want to double or triple the recipe. 

Thursday, May 23, 2013

Sauceless Chicken Parmesan

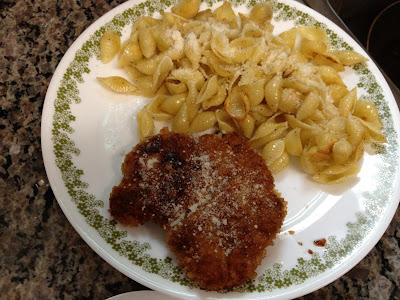
sauceless chicken parmesan and buttered shells
Tonight I made a sauceless chicken parmesan. My husband doesn't like anything with tomato sauce, so I figured, what the heck! Let me give a sauceless parmesan a try. Okay okay, I hear you. Chicken parmesan without the sauce is just fried chicken. Perhaps! 

The first thing to consider is the chicken. Instead of breast meat, I got boneless, skinless chicken thighs. They are around 150 calories and 2 grams of saturated fat for 4 oz. of meat. The other thing you want to do is to use a meat tenderizer to soften and thin the meat.

Get three plates. In the first one put some bread crumbs. In the second, put an egg with some water. I use water to extend the amount without adding the calories and fat of an extra egg. In the third, I put panko. Put the chicken in the bread crumbs first, making sure the chicken is thoroughly covered on both sides. Then put the chicken into the egg, again covering both sides. Then into the panko the chicken goes. Yep, both sides should be covered!

Spray a frying pan with Pam. I use the olive oil variety. Then put in a tablespoon of olive oil. Heat the oil on a medium burner flame.

Put the chicken into the frying pan. Sprinkle pepper and salt on the chicken. If you need more oil, add it.

Let the chicken sit for around 5 minutes before you flip it with a rubber spatula and spoon. The crust should be somewhat brown. Wait another 5 minutes before flipping.  Continue to flip. Total cooking time is around 20 minutes, because the chicken is thin.

Take the chicken out of the pan onto a dish with a paper towel (to sop up any extra water). Transfer to plate, and sprinkle with parmesan cheese.

As a side, I made butter noodles with parmesan. Boil the noodles as directed on the box. Drain. Then put the noodles in a frying pay with a tablespoon each of olive oil and butter. Saute some onion. Add pepper and salt. Add the pasta. Saute the pasta to the desired crispiness. Before you take the pasta out of the pan, add some parmesan.

That's how you make sauceless parmesan chicken!

Wednesday, May 22, 2013

Salmon Kebobs


salmon kebobs by themselves
I found this recipe in the June 2013 Bon Appetit, and I thought what the heck, let me try it. Now I have to admit up front that I am not a huge fan of salmon. Usually when I'm forced to eat salmon, I douse it with ketchup. My husband loves, loves, loves salmon, so I thought I would give this a try.

The most important part of the recipe is getting a good piece of salmon. You will want to get something that's fairly thick and skinless. Then cut the salmon into rectangular pieces. You shouldn't make the pieces too small or too big. The pieces in the kebob to the left are around 1 inch wide and 1.5 to 2 inches long.

In addition to salmon, you will need to make sure you have the spice mix listed below, fresh lemon, and olive oil on hand.

To make 2 kebobs (1 kebob for each person):
  1. Put your kebob sticks in water for around an hour. This will prevent them from burning as you cook.
  2. Cut the salmon.
  3. Mix your ingredients for the spicy concoction that you'll use on the salmon. 
    1. 1 tsp dry oregano (or 1 Tbsp fresh oregano)
    2. 1 tsp toasted sesame seeds
    3. 1/2 tsp ground cumin
    4. 1/2 tsp kosher salt
    5. sprinkle of red pepper flakes
  4. Alternate the salmon with lemon slices on the skewers. Use 2 skewers for each kebob so you can  flip the salmon without the pieces rotating. Each kebob should have a salmon piece at the start and end of the kebob.
  5. Brush olive oil on the kebob.
  6. Sprinkle with the spicy concoction.
  7. You have two choices for cooking methods. 
    1. salmon kebobs with roasted potato wedges
    2. You can grill the salmon kebobs on an outside grill. Make sure to flip the kebobs periodically.This should take about 5-8 minutes.
    3. You can saute the kebobs in a frying pan. Make sure to flip the kebobs periodically. Depending on how hot the pan gets, it will take around 15 minutes or so.
  8. The kebobs are done when the salmon doesn't have that red color in the center of the kebob piece.
As I said, the salmon was extremely tasty. I didn't need any ketchup, and the salmon flaked off the kebob. I made roasted potato wedges as a side, but you can make rice, grilled veggies, or salad.